
Truth table processing is a common thing in Software although we often do not recognize it while programming. The results could be endless if then else code etc. Time to develop an engine that gets inputs throws it through a piece of code and the results come out.I actually built a program recently for a client, but decided that there was still too much work to be done in setting up the code. Time for another approach.
Excel is an excellent spreadsheet program (like any spreadsheet for that matter) for building truth tables. Excel also support VBA (Visual Basic of Applications). So why not enter the truth table in Excel and generate all the necessary code for an Arduino sketch. This was the first version actually. Just fill in a truth table, push generate and it would actually generate an Arduino sketch ready for compilation and uploading.
However the client requested the possibility to intervene in the truth table process. So a new version was built. Some coding is still needed (later on) but the actual truth table or multiple truth tables can be integrated, intervende or even put in sequence.
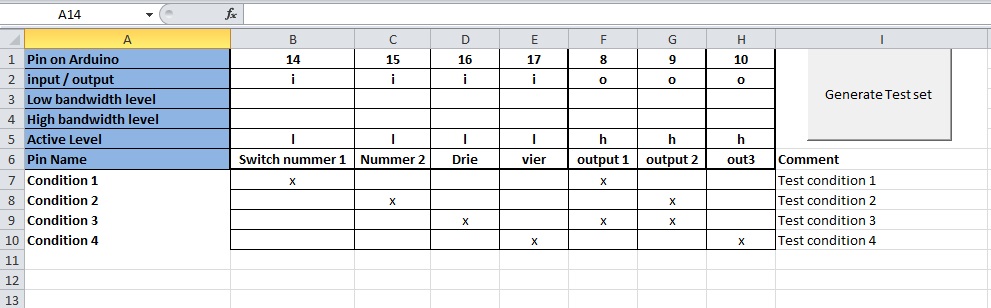
A typical truth table from the Excel sheet looks like this:
Truth table description
in this example I have inputs on pins 14-17 (= Analog ports A0-A3) and output ports on pins 8-10. The first row defines the pins and the second row whether it is input or output or analog (use “a”).
If we are using an analog port we can add a bandwidth where the value must fit in (lower and upper bound). Make sure you allways fill some value (i.e. Lower = 0 and upper = 1023 would mean any value).
Row 5 determines when an input is active. If for example you are using pullup resistors on the input then the active level would be LOW and vice versa. For the outputs it means more or less the same in that if an output pin is inactive and active level would be HIGH then it will output default a LOW. or if active level is LOW then the output would default be HIGH.
The next row shows the name of the pin. When an include file is generated, then the pins are defined with this name. In capitals and in-between spaces replaced with underscore.
Extending the columns is probably easiest by inserting a column (or deleting a column).
The VBA code searches row one (1) until a column is not filled-in to determine the pins used.
The code can handle a max of 32 inputs and 32 outputs.
Truth Table input
each row maps a combination of input pins to a combination of output pins. An “x” means the input (or output) is active. In the above example I am mapping a pin to a binary output. You can extend with more rows (max 10000 but you will run out of memory before that:)). Column 1 is a name given to this test case. You must fill in some text as the VBA searches this column for the last entry (= blank).
Each entry in the truth table cases consumes 8 bytes no matter how many columns are occupied.
The tab page name is used to fill in a default file name when generating. Changing this name to any preferred name will change the default name.
Generation process
Well this is the easy part. Just push the Button. Make sure you have enabled macro’s in Excel for this button to work. A file save dialog will be opened and you can select the location and file name to save. You will notice that the default name is the name of the TAB page in Excel.
Development Chain
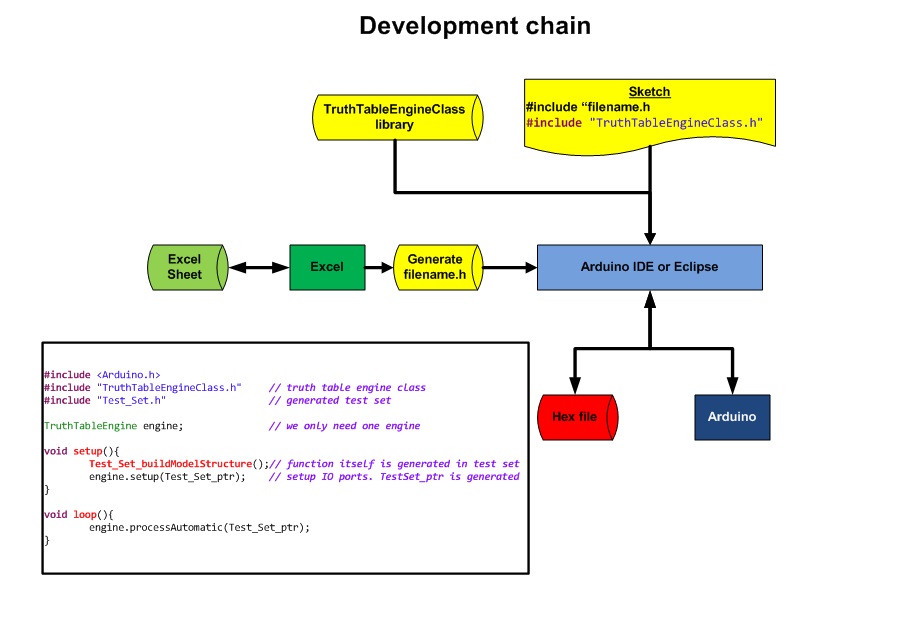
As you can see it is a pretty straight forward process.
- create/update the truth table
- Generate an include file (.h)
- create update the sketch (like in the text box above).
- compile
- upload (or download which ever you want to call it) to the Arduino and you are done.
Also take note of the comments in the program:
- Test_Set.h is the name I gave the file in the TAB Page. In the code itself, parameters get this name as well (like Test_Set (is a structure containing all the variables used for the engine) and Test_Set_ptr (= pointer to the same).
- In the include file a function is generated (in my case Test_Set_buildModelStructure() .This sets all the correct pointers etc. Do this for each generated include file added to the sketch.
- engine.setup(Test_Set_ptr) sets the input and output pins used in Test_Set.
- In the loop() engine.processAutomatic(Test_Set_ptr) processes all the steps from reading inputs, mapping to the truth table and setting the correct outputs.
How does it work
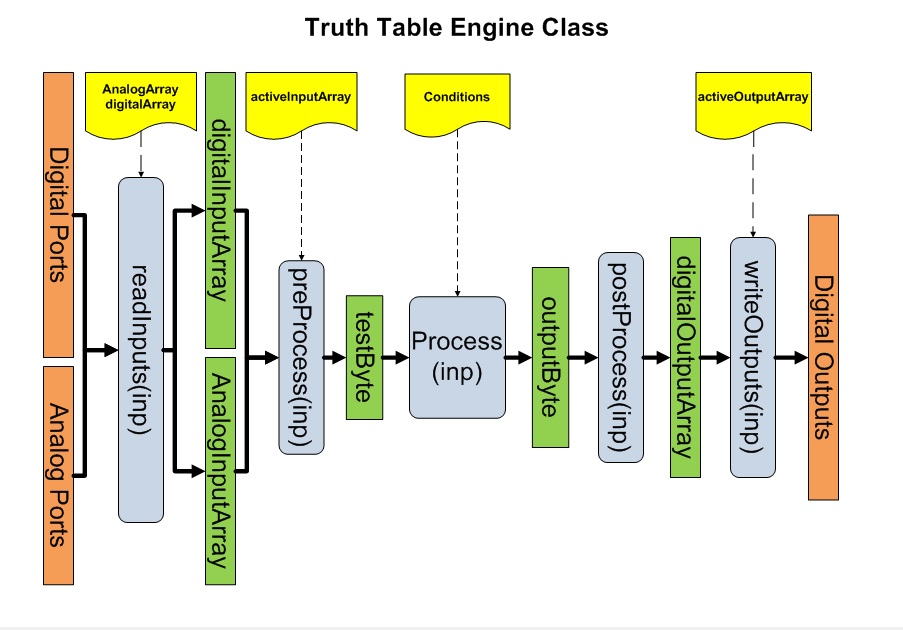
The engine has a number of methods:
readInputs(pointer to test cases)
reads the input pins (both digital and analog) and puts them in an array. No modifications are done to the values here.
preProcess(pointer to test cases)
reads the array with all the values and maps:
- digital values into a 32 bit field (testByte) where the code takes into account the active input levels.
- analog values are added to testByte where if the value is within the upp/lower bound as a “HIGH” and otherwise as a “LOW”.
process(pointer to test cases)
The value in testByte is compared to each value in an array with all the testcases. Once found the search is terminated. So if you have a lot of test cases, I would put the most frequent once on top for speed improvement.
The resulting output is stored in a 32 bit output field.
postProcess(pointer to test cases)
This step maps the output field into an array without changing any values.
writeOutputs(pointer to test cases)
Copies the results from the output array to the actual output pins but takes into account the active output levels array.
info about the generated include file
The file generates all the necessary arrays with all definitions and testcase patterns. It also generates a function used to build a structure. A pointer to this structure is used to pass as a parameter minimizing stack usage.
Also some code is generated for Eclipse “baeyens it plugin”. Just leave the code as is. This will then work on both Arduino IDE (tested with 1.0.5) and Eclipse.
So this is about it. you can download the code from : https://github.com/nicoverduin/TruthTableEngineClass